2026-10-03 · Guides
How to add GTINs in WooCommerce (with the built-in field)
A GTIN is the number under a product's barcode. Shopping systems use it to know that the jar of honey on your store is the same jar of honey on ten other stores. Google Shopping asks for it, and AI shopping assistants lean on the same kind of product data when they decide what to recommend. Without one, your product is harder to match, compare and trust.
WooCommerce has had a built-in field for it since version 9.2, so you don't need a plugin. This guide shows where it is, what to put in it, and how to check it worked.
What counts as a GTIN
GTIN is the umbrella name. The number on your product will be one of these:
- UPC (12 digits): common in the US and Canada.
- EAN (13 digits): common in Europe, Australia and most other places.
- ISBN (13 digits, or 10 on older books): books.
- GTIN-14 (14 digits): usually on outer cartons, not single items.
All of them go in the same WooCommerce field. Type the digits only, with no spaces or dashes.
Only use a real number. If you make your own products and have never bought barcodes, you don't have a GTIN, and inventing one does more harm than leaving it blank, because a made-up number can match someone else's product. Brand owners get real numbers from GS1, the body that issues barcodes. If you resell, the number is printed on the packaging or in your supplier's product sheet.
Step 1: find the number
Look at the barcode on the product or its packaging. The digits printed under the bars are the GTIN. Your supplier's price list or product spreadsheet usually has a column called EAN, UPC or barcode too. That is the quickest way to get numbers for a whole range.
Step 2: open the product's Inventory tab
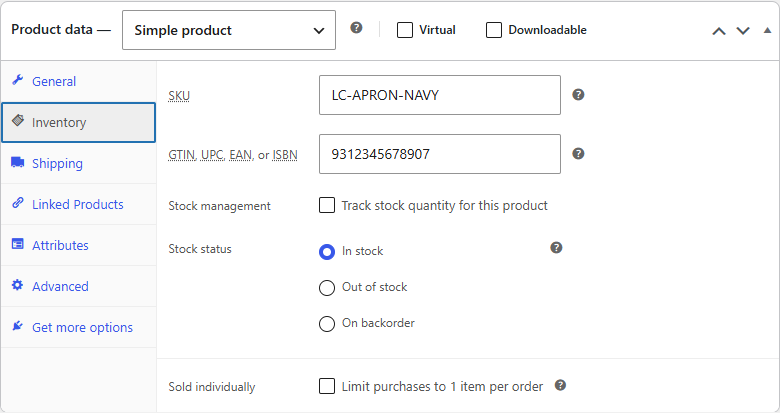
In your WordPress admin, go to Products, click the product, and scroll down to the Product data box. Click the Inventory tab on the left.
Step 3: type the number
Put the digits in the box labelled GTIN, UPC, EAN, or ISBN, then click Update at the top right of the page. That's it for a simple product.
Two things that often go wrong:
- Pasting with spaces. "5 012345 678900" won't be accepted as a clean number. Remove the spaces.
- Putting the GTIN in the SKU box. The SKU is your own stock code. Keep the two separate, so the SKU can stay whatever your warehouse uses.
Step 4: add numbers to each variation
If a product comes in sizes or colours, each one usually has its own barcode. Open the Variations tab, expand each variation, and you'll find the same GTIN, UPC, EAN, or ISBN box there. Fill it in for every variation that has its own barcode, then click Save changes.
If the variations really do share one barcode (rare, but it happens with some bundles), put the number on the main product only.
Step 5: fill many products at once
Typing numbers one by one is fine for ten products. For a hundred, use a spreadsheet:
- Go to Products → All Products and click Export. Tick at least the ID, SKU and GTIN columns.
- Open the file in a spreadsheet. Fill the column called GTIN, UPC, EAN, or ISBN from your supplier's list, matching rows on SKU.
- Format that column as text before you paste, so the spreadsheet doesn't turn long numbers into "5.01235E+12" or drop a leading zero.
- Go back to Products → All Products, click Import, choose the file and tick Update existing products. On the column mapping screen, make sure the GTIN column maps to the GTIN field.
Import a small test file with two or three products first and check them before you run the full file.
Check your store in 10 seconds
The free online checker runs 5 outside checks on your store, including this one, and gives you a score out of 5.
Step 6: check it reaches your product page
WooCommerce writes product details into each product page as structured data: a block of code that search
engines and AI tools read instead of guessing from the page design. When the GTIN box is filled, that block
includes a gtin value.
To see it, open the product page in your browser, right-click and choose View page source, then search
for gtin. On our test store, the apron above shows "gtin":"9312345678907" right after its SKU. If you
can't find it:
- Clear your cache. A caching plugin or your host may still be serving the old page.
- Check your SEO plugin. Some SEO plugins replace WooCommerce's structured data with their own. Look in the plugin's WooCommerce or schema settings for a GTIN option, or test the page in Google's Rich Results Test to see what it actually outputs.
How many products need it
All of them, ideally, but start where it pays. Fill your best sellers first, then everything you advertise, then the rest. In our census of 100 WooCommerce stores, only 4 of the 76 product pages we could read had a GTIN or MPN, so even a partly filled catalogue puts you ahead of most stores.
If a product genuinely has no GTIN (handmade, made to order, or your own brand with no barcodes), give it a brand and keep your SKU as the manufacturer part number instead. Our guide on adding a brand to WooCommerce products covers that.
Check the whole catalogue
Checking one page by hand is easy. Checking every product is what the free plugin does: it counts how many products are missing a GTIN or MPN, a brand, an image or a real description, and lists them in order of how much each fix is worth.