2026-10-03 · Guides
Add a brand to WooCommerce products
"Brand" sounds like marketing, but for shopping systems it's data. When an AI assistant or Google Shopping reads your product page, the brand is one of the first things it uses to work out what the product is and whether it matches what the shopper asked for: "a Le Creuset casserole dish", "an apron from a small linen maker". A product with no brand is just a name and a price.
WooCommerce has a built-in Brands feature (it became part of WooCommerce itself in version 9.6, so on an up-to-date store you don't need an extension). This guide shows how to use it.
Who is the brand?
- If you resell other companies' products, the brand is the manufacturer's brand, exactly as it's printed on the packaging.
- If you make your own products, the brand is your own brand name, usually your store's name.
- If it's unbranded, leave it empty rather than inventing one.
Use the same spelling every time. "Linen & Co", "Linen and Co" and "LINEN&CO" look like three different brands to a machine.
Step 1: open Products → Brands
In your WordPress admin, go to Products → Brands. If you don't see it, update WooCommerce. Older versions needed the separate WooCommerce Brands extension, and if you used that before, your existing brands carry over.
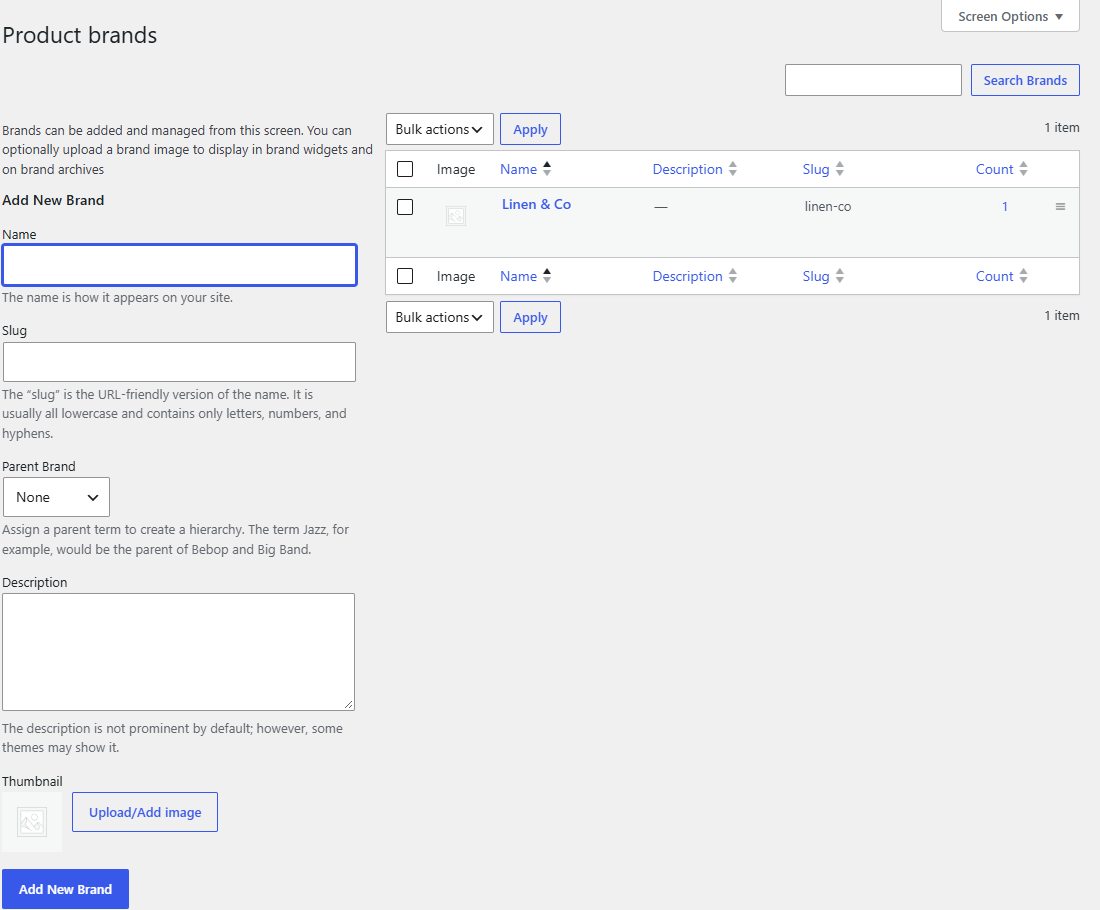
Step 2: create your brands
Fill in the Add New Brand form on the left:
- Name: the brand as customers know it.
- Slug: leave it empty and WordPress makes one from the name.
- Description and Thumbnail: optional. Some themes show them on the brand's archive page.
Click Add New Brand. Repeat for each brand you sell. If you only sell your own brand, you need just one.
Step 3: assign a brand to each product
Open a product (Products, then click its name). In the right-hand column there's a Brands box, much like the Product categories box. Tick the brand and click Update.
A product should normally have one brand. Ticking several makes it unclear which one made the product.
Step 4: assign brands in bulk
For a large catalogue, use bulk edit:
- Go to Products → All Products. Filter or search to show the products of one brand, for example by searching for the brand name or filtering by category.
- Tick the products, choose Edit from the Bulk actions menu and click Apply.
- In the bulk edit panel, tick the brand in the Brands list and click Update.
You can also set brands with a CSV import. Export a few products first (Products → All Products → Export) to see the exact column name your store uses, fill it in, and import with Update existing products ticked. Try two or three products before the whole file.
Check your store in 10 seconds
The free online checker runs 5 outside checks on your store, including this one, and gives you a score out of 5.
Step 5: check the brand reaches the product page
WooCommerce writes each product's details into the page as structured data, the code AI tools and search
engines read. When a product has a brand, that block includes it. To check, open the product page, right-click,
choose View page source, and search for "brand". You should see something like:
"brand":{"@type":"Brand","name":"Linen & Co"}
On our own test store, the brand appears here as soon as it's ticked on the product. One thing we noticed:
our test brand "Linen & Co" came out as Linen & Co in the structured data, an encoding quirk with
the ampersand. If your brand name contains an &, check how it appears in your page source. Most systems
reading it will cope, but if you have the choice, "and" avoids the question.
If there's no brand in the source at all:
- Clear your cache so you're not looking at an old copy of the page.
- Check your SEO plugin. Some replace WooCommerce's structured data with their own and have a separate setting for which field to use as the brand. Point it at the WooCommerce brand.
Brand plus part number when there's no barcode
If your products have no GTIN (handmade, made to order, or your own brand without barcodes), the brand becomes even more important. Shopping systems accept brand plus manufacturer part number (MPN) as the next best identifier. If you're the maker, your SKU can serve as the MPN, as long as each SKU is unique and stays the same.
Where you do have barcodes, add those as well. Our guide on adding GTINs in WooCommerce shows where they go.
Check every product at once
The free plugin counts how many of your products are missing a brand, a GTIN or MPN, an image, attributes or a real description, and puts the biggest gap first. On our partner store, filling in brands and other product data was part of what moved its score from 77 to 96.